


Photo by Vincentiu Solomon on Unsplash
Implementing a Data Lakehouse Architecture in AWS — Part 2 of 4


Introduction
In part 1 of this article series, we walked through how to feed a Data Lake built on top of Amazon S3, based on streaming data, using Amazon Kinesis.
In part 2, we will cover all of the steps needed to build a Data Lakehouse, using trip data from New York City Taxis as a data source. This data is publicly available from the Registry of Open Data on AWS.
Problem to Solve
Our main goal in finding a solution is to provide an easy way to understand some methods involved in the ETL (Extract, Transform, and Load) process, using the top-notch technologies available from AWS and the Open Source ecosystem. This is applied to our process as we will ingest the data into our Data Lakehouse from a publicly available source, organize the data by applying the right data schema and some data partition techniques, and process it using Delta Lake within a centralized Data Lakehouse to provide some insights from the original data.
Journey
Among the several ways to extract the data from the Registry of Open Data on AWS, we will use a simple Python script to achieve this goal. This is completed by copying it from its source and putting it into the RAW zone. With the original data in CSV format available in the RAW zone, we will adjust the schema for each table, fixing data types and field names, while making it available for a query at the Trusted zone, organized in partitions of year and month.
In the last step, our data is now organized, so we will process it again, this time with a very useful Open Data Format, called Delta Lake, widely used by many organizations. Delta Lake is an open-format storage layer that delivers reliability, security and performance to a data lake, allowing for a cost-effective and scalable lakehouse. Terraform will be used to automate the creation of necessary resources and ensure version control.
Below is each used resource and its role in that context:
Secrets Manager — Used to store the GitHub credential;
Amazon EMR — The managed Big Data platform for running large-scale distributed data processing jobs, leveraging the strategy to spend fewer computation costs using Spot instances, in that context, we’ll use it with Apache Spark;
Amazon S3 — We’ll use S3 buckets to store the data (extracted, processed);
Bucket: s3://nyc-tlc (NYC taxi data source)
Bucket: s3://dataeng-blog-series (Destination bucket)
AWS Glue Schema Registry — The repository to store and control the schemas and their versions for each object of our Data Lakehouse;
AWS Glue Data Catalog — Used to have a unified object metastore;
Amazon Athena — Used to query the data stored in the S3 bucket.
The diagram below illustrates the proposed solution’s architectural design.
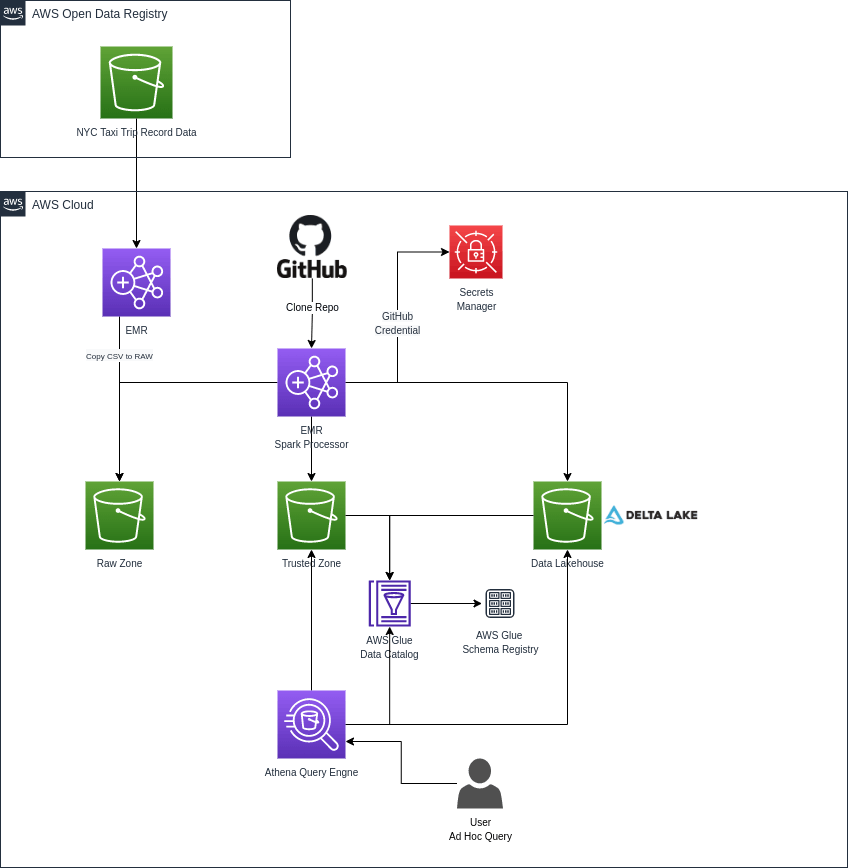 Architecture definition
Proposed Environment
AWS Service Creation
To start the deployment, we will validate the infrastructure code developed with Terraform.
If you don’t have Terraform installed, here we’ll see two approaches, installing from the repository and downloading the standalone version.
# Installing from repository
$ curl -fsSL https://apt.releases.hashicorp.com/gpg | sudo apt-key add -
$ sudo apt-add-repository "deb [arch=amd64] https://apt.releases.hashicorp.com $(lsb_release -cs) main"
$ sudo apt-get update && sudo apt-get install terraform
$ terraform -version
Terraform v1.1.9
on linux_amd64

# Standalone version
$ curl -o terraform.zip https://releases.hashicorp.com/terraform/1.1.9/terraform_1.1.9_linux_amd64.zip && unzip terraform.zip
$ ./terraform -version
Terraform v1.1.9
on linux_amd64
Now we will need to initialize Terraform by running terraform init. This command will generate a directory named .terraform and download each module source declared in the main.tf file.
There is a useful command to validate the terraform code before the plan, terraform validate.
Following the best practices, always run the command terraform plan -out=emr-processing-stack-plan to review the output before starting, creating or changing existing resources.
After getting the plan validated, it’s possible to safely apply the changes by running terraform apply “emr-processing-stack-plan”. Terraform will do one last validation step and prompt confirmation before applying.
Data processing using Amazon EMR
By far, the most popular storage service for a Data Lakehouse is Amazon S3. EMR will allow you to store the data in Amazon S3 and run PySpark applications as you need to process that data. EMR clusters can be launched in minutes. We don’t have to worry about node provisioning, internal cluster setup, or other application/framework installation.
One of the most used strategies to achieve cost efficiency is using the purchasing option of Spot instances. In many cases, this can represent more than 60% of savings, however, this will be according to the instance type and their availability within the selected AWS region.
AWS has a very good resource called Spot Advisor, which helps us to identify the best instance type. This tool gives us north in terms of savings and the probability in % that our instance could be removed from the ERM because of high demand. This situation will occur only when someone else is intended to pay more for the selected instance type than what was defined during the cluster creation, and it works by defining the right value for the bid price.
Data Ingestion
The data that is available from the NYC Taxi Trip will be transferred from their public S3 bucket while preserving its original format, CSV files. We’ve created a logic to copy the data by providing some parameters, such as:
Type of information to ingest, which could be trips related to yellow or green taxis and zone lookup data;
The corresponding year of trip data, in a four-digit year (2020);
The range of months to copy related trip data.
Below is a sample execution command to execute data ingestion.
# To extract data related to yellow taxi from January to December of 2020.
spark-submit ingest_raw_data.py --type yellow --year_data 2020 --interval 1-12

# To extract data related to green taxi from January to December of 2020.
spark-submit ingest_raw_data.py --type green --year_data 2020 --interval 1-12
Below is the data that lands inside the bucket after extraction from the source.
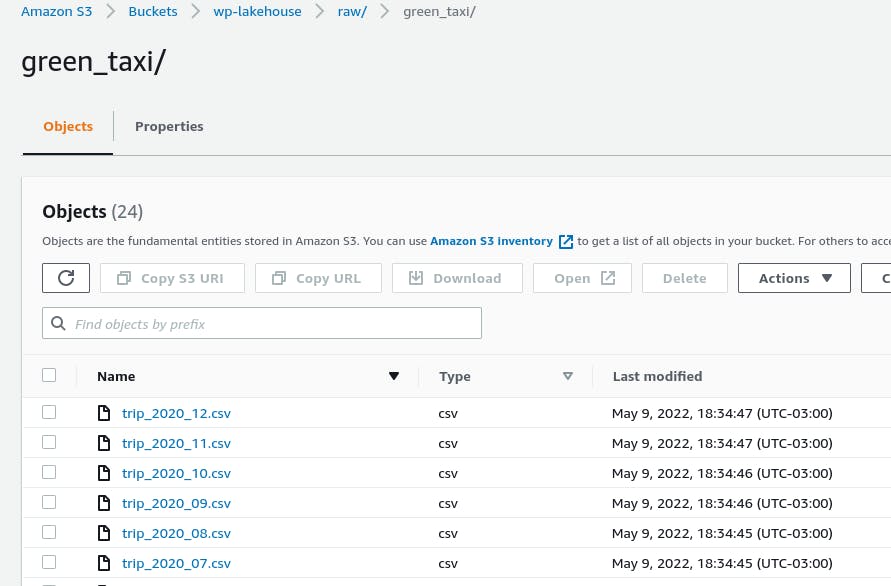 Green taxi CSV files that landed in the RAW zone.
Data Processing — Trusted Zone
The second step of our data preparation process consists of getting the extracted data from the RAW zone, parsing the data by applying a new well-defined schema with the right data types for each column, writing this data in parquet file format, and applying the partitioning by year and month that corresponds to the data.
Below is a sample execution command to process data from the raw zone to the trusted.
# To process data related to yellow taxi.
spark-submit process_trusted_data.py --type yellow

# To process data related to green taxi.
spark-submit process_trusted_data.py --type green
By looking at how the folder structure appears inside our S3 bucket, we could see the first level of the green taxi table as the year for the corresponding chunk of data and the next level related to months.
 Green taxi Trusted zone partitioned.
In our architecture, we are leveraging the resources of AWS Glue, and in this case, our tables will be created inside the AWS Glue Data Catalog by receiving the schema definition from AWS Glue Schema Registry.
Here we can see the schema of the yellow taxi table and its definition inside the Data Catalog.
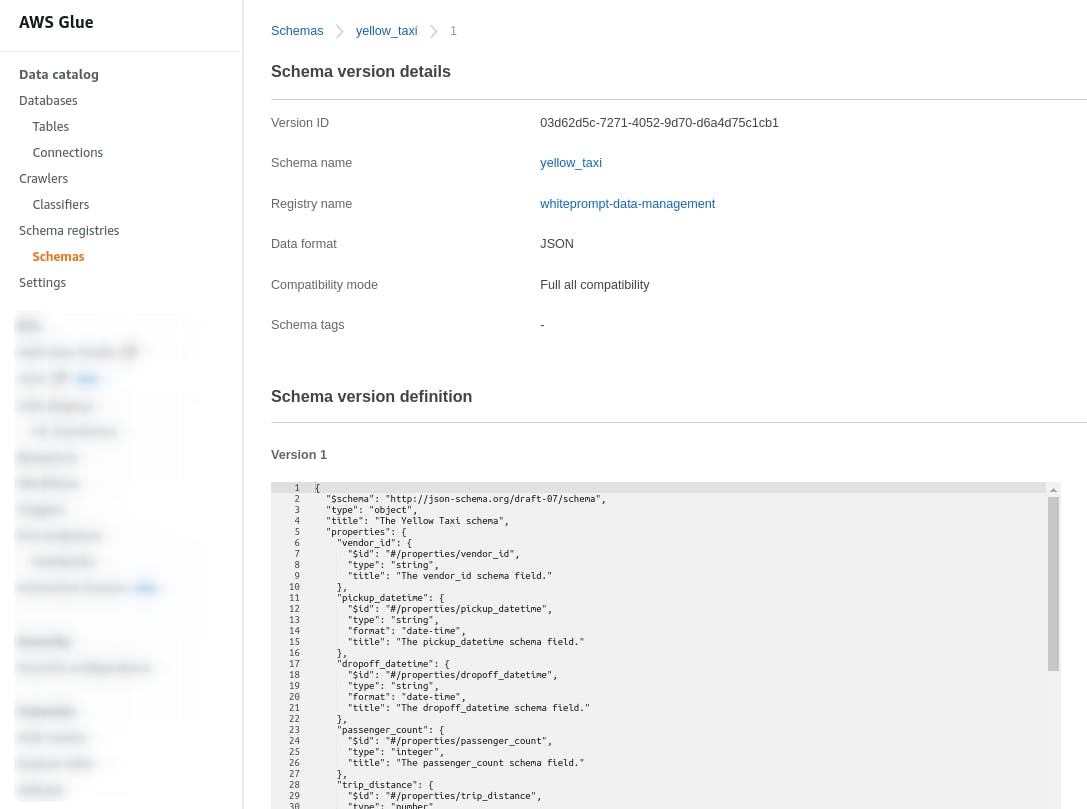 AWS Glue schema definition.
 AWS Glue table schema definition.
Now, we can check the data processed by running a simple query using Amazon Athena.
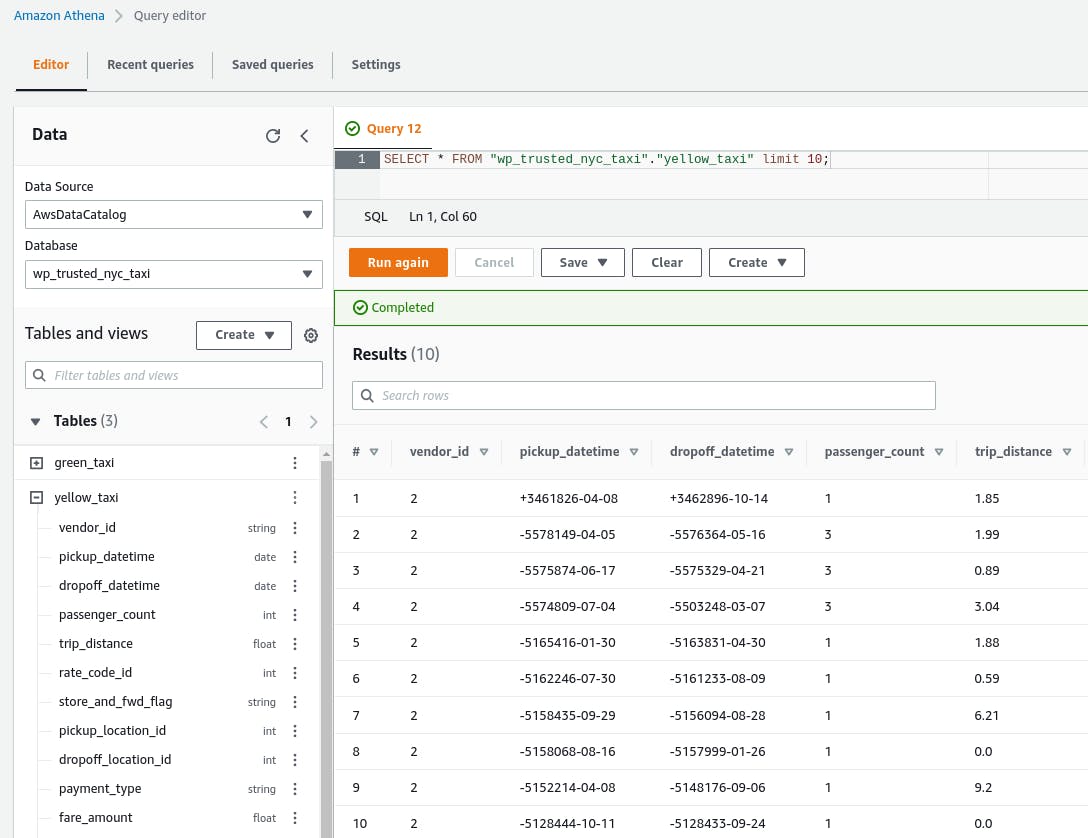 Amazon Athena query results.
Data Processing — Refined Zone / Lakehouse
Very similar to the processing performed in the trusted zone, we will now utilize the Delta Lake to create a Data Lakehouse and guarantee ACID transactions, while also allowing for the possibility to check the history of changes for a particular record, which we call time travel and much more.
We have created four tables that show some insightful information about the trips that occurred in NYC. Let's see what each one shows us:
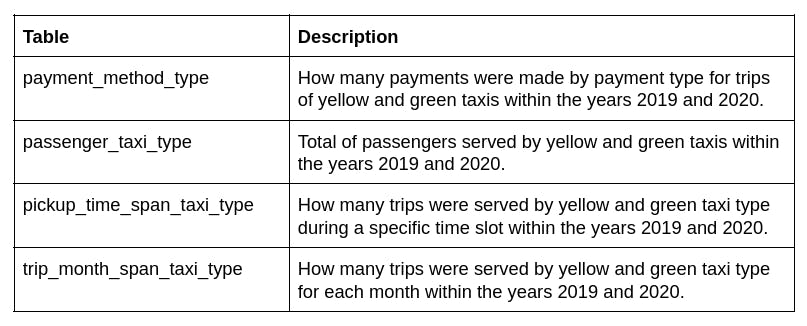 Table details.
Our logic to process the data will create the four tables at the same time and take care of updating the Delta files list used by Amazon Athena to query data efficiently.
# To process data related to Data Lakehouse.
spark-submit process_lakehouse_data.py
Below, you will find the folder structure organization of the Data Lakehouse tables.
 Refined zone.
Here is the query result using Amazon Athena.
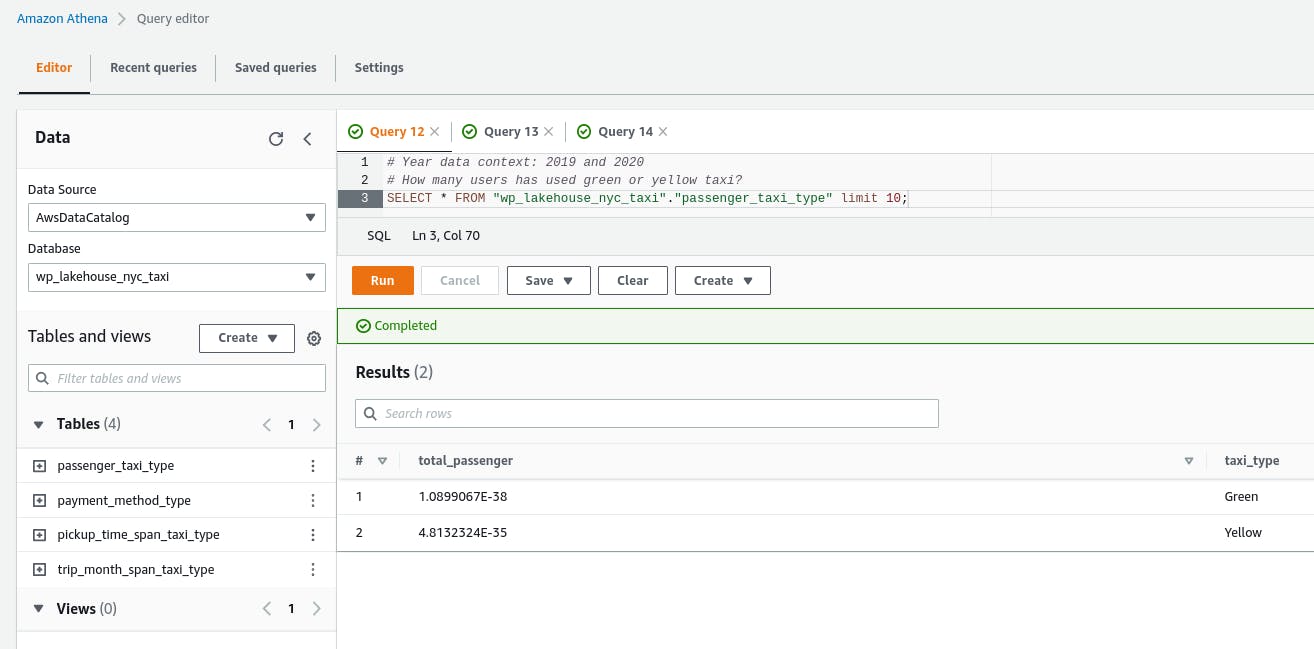 Amazon Athena query results from Lakehouse.
For each one of the tables, we’ve defined the schemas that are integrated into the Glue Data Catalog so that every change will be automatically delivered to Amazon Athena.
Below is a list of all schemas available inside the Glue Schema Registry.
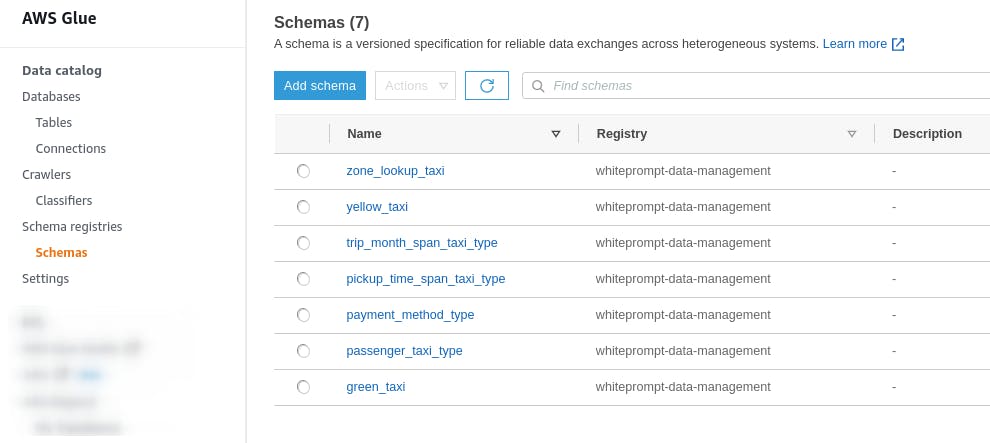 AWS Glue schemas.
Finally, we must destroy our infrastructure by running the command terraform destroy to avoid extra costs. By running the destroy command first, you will be asked for confirmation before proceeding. When submitting yes, the infrastructure will be deleted.
Conclusion
Going through the approach of batch processing is one way to start data democratization inside companies. This can be started by extracting the data from selected sources and even using the data we already have from relational databases or APIs. Our suggested architecture is leveraging the existence of a public dataset to demonstrate the ETL process using EMR, S3, Glue, and Athena.
The new paradigm of the Data Lakehouse architecture is arriving to deliver more opportunities to the businesses that are planning to start their Data-Driven Journey, where now the range of technology, frameworks, and cost related to the Cloud Platform is more attractive than ever.
Repository with the code used in this post.